The post 6 Different Infinity Dress Back Options appeared first on Maternity Sewing.
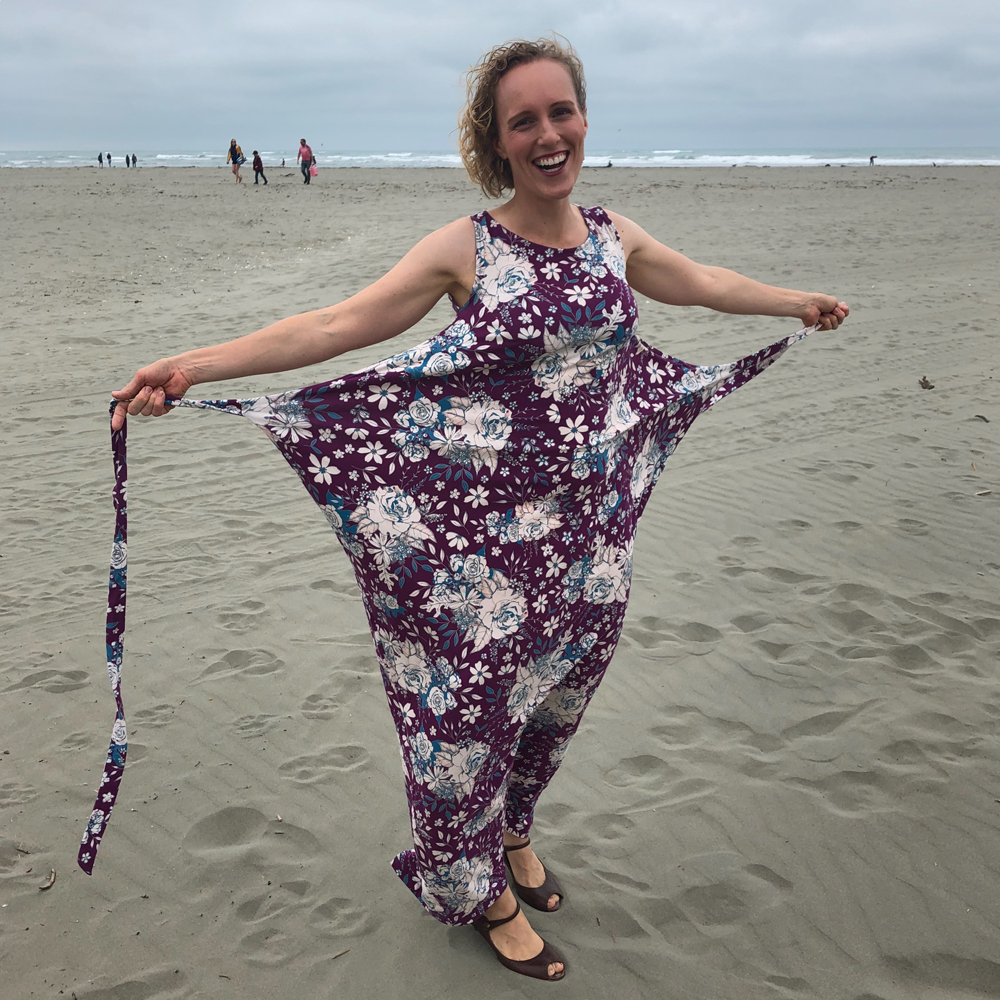
]]>Our infinity dress sewing pattern has instructions for a deluxe version that works for either pregnant or not pregnant bodies! It also includes an optional bandeau that you can wear (or not) with any of these styles for increased skin coverage, especially in the back where it will cover a bra.

1. Cross. One of the simplest backs is a simple cross. You can control the width of the straps by spreading, gathering, or twisting them.
2. Twisted Cross. Add a little interest to the back cross by twisting the straps around each other where they cross.
3. Column Twist. Repeatedly twist your straps around each other to make a column. If you twist each strap independently first and then twist them around each other the other direction (clockwise vs. counter-clockwise) your twist will be more defined.
4. Single Strap. For front twist design that go over a single shoulder you can continue to treat the two straps as one for their whole length.
5. Wide Set Straps. Show off your back décolletage by keeping your straps straight and wide set.

6. Interwoven. Get fancy! I’m not even sure I can repeat how I did this one, much less describe it. But if you think of the wraps that go around your body as something you can weave in and out of the straps that go vertically then you can make some creative displays.
The post 6 Different Infinity Dress Back Options appeared first on Maternity Sewing.
]]>The post Draft Your Own Maternity Shirt: Swing Version 2 appeared first on Maternity Sewing.
]]>
If you have a t-shirt pattern that fits you in the chest and arms you can hack it into a variety of different maternity shirts pretty easily. In this blog post we’ll walk you through how to hack a pattern into a belly skimming swing maternity tee shirt.
Start by selecting a size on your shirt. Our general rule for using a standard pattern while pregnant is that you’ll probably want to go up a size or two from your pre-pregnancy size, and/or if your shirt pattern has separate cup size options you may want to choose a larger cup size. Over the course of pregnancy you gain weight all over your body, not just your belly. The amount each woman gains, when during her pregnancy she gains it, and how that affects her size (especially cup size) is different for each woman and if this is your first pregnancy it can be hard to predict. Better to have your shirt be a little loose than uncomfortably tight during a time when all of you is uncomfortable to begin with!
All that being said about size selection, the way we add volume to this shirt actually adds volume to the upper bust and full bust so this may be enough to compensate for weight/cup size gain and you may not have to start with a larger size.
Next select your fabric. You’ll want to follow the fabric suggestions (most especially the stretch percentage) of your original shirt. Another way to ensure that it will be comfortable as you gain weight (other than going up in size) is to use a higher stretch percentage fabric so consider using fabric that’s even stretchier than that suggested by the pattern.
It’s up to you whether you want to add the extra volume to both front and back or just to the front. In this example we added swing to both. It makes for a maternity shirt that is loose all over and works well for postpartum because the looseness looks intentionally styled (instead of when it’s just in the front and only emphasizes your belly). This is what it looks like on a body with a small belly.

To make the swing pattern, draw a line from the shoulder to the hem on your Front (and Back if you want). Cut along the line leaving a small attachment at the shoulder and pivot the pieces apart. It’s up to you how much width you add. Too much distorts the shape but too little won’t fit a third trimester belly. In this example we added 7″ with the pivot.
A large belly takes up both length and width. You can see in the photos that Gillian’s shirt rides up a bit in the front. If you don’t want this you can add a few inches (3″ is a good place to start) to hem at the center front of your shirt and draw a new gently curved hem (keeping the side seam length the same). This makes the shirt unsuitable for postpartum but you can always re-hem it.
Of course if you don’t want to draft your own pattern, you can always buy the perfect pattern already ready for you in our shop! Browse all of our knit shirts or, if you’re specifically looking for a swing style we recommend:
-
Sirocco Top & Dress
$12.00 Add to cart
The post Draft Your Own Maternity Shirt: Swing Version 2 appeared first on Maternity Sewing.
]]>The post Nursing Friendly Clothes Aren’t Always Pumping Friendly appeared first on Maternity Sewing.
]]>During pregnancy, I had invested in some maternity/nursing dresses and made a few Colette Moneta’s (which seemed to be a favorite for nursing without modifying in the blogosphere).
On my first day back at work without my baby, I had the uncomfortable realization that I could not access both breasts simultaneously while staying fully dressed, even though I was wearing a nursing friendly RTW (ready-to-wear) dress. I do not have access to a pumping room (and I refuse to pump in the restroom), and my work is time sensitive; so, I had to partially undress to pump. (Good thing I had an extra baby blanket on hand.)
After this frustrating experience, I really took a look at my wardrobe and realized that discretely pumping with a good chunk of my “nursing” clothes wasn’t really an option. My button downs only worked if I could wear a loose tank top underneath, and my comfortable bra dresses were too revealing to wear to work. Naturally, I went to my pattern library in search of items that would be nursing AND pumping friendly.
I tried the usual hack of a dress where you lift up the outer fabric to reveal a lining with holes. I found those to be great for pumping, but not great for nursing since trying to get prepared for nursing with a hangry baby takes too long. I also tried wearing two full length shirts but I found that to be a rather unwieldy solution, especially in the colder months since you’re wearing all the layers. (Am I the only one that forgets to put the top layer back down?)
I’ve never much liked the crop top trend for myself. (I grew up watching I Dream of Jeannie and in one-piece bathing suits; I have an aversion to showing my midriff or belly button.) Nevertheless, I made some crop tops to wear with my bra dresses, pinafores, with tank tops, avoiding the whole exposed bellybutton issue. These quickly became an integral part of my “momiform” because they aren’t too hot to wear, provide modesty, and make nursing AND pumping access a breeze.
Furthermore, I was able to make comfortable things for myself. Our bodies are changing constantly (I very much underestimated the variation in cup-size throughout the course of one day), it’s really great to wear things that you made especially for yourself. Finding time to sew just a few tops to mix and match with what I had let me have some much needed “me time”; time to not be thinking about my baby, my husband, the state of the house, or my dogs. This really helped me to be a better mother/wife/caretaker since I wasn’t so on edge. Plus, I would put on my tops and just beam with self-confidence; it’s amazing how you can feel so great in something you made, flaws and all.
-
Roksi Trio
$13.50 Add to cart
The post Nursing Friendly Clothes Aren’t Always Pumping Friendly appeared first on Maternity Sewing.
]]>The post Kielo Wrap Dress Nursing Hack appeared first on Maternity Sewing.
]]>
It’s often said that “necessity is the mother of invention”. The sewing community has come up with countless clever pattern alterations to make beautiful clothes practical for nursing. I’m delighted to share with you an easy hack for making a nursing friendly Kielo Wrap Dress.
The Kielo Wrap Dress by Named Clothing is one of the darlings of the indie sewing world. The pattern’s concept is simple but the wow-factor and elegance of the finished dress is almost off the charts. The Kielo looks fabulous on all sorts of body shapes and sizes and works in a range of fabrics. As Lisa highlighted in her most recent blog post here, the Kielo is completely adjustable at the waist and quick to sew making it an ideal maternity garment.

I’ve admired the Kielo since I first discovered the online sewing community in 2017. There was only one thing holding me back. Wearing the Kielo as drafted would definitely make my milk bar “closed until further notice”. I kept an eye out for Kielo nursing hacks online but found a surprising lack of resources on this topic. The Kielo was cast into the “one day after nursing” section of my sewing list.
And then this summer we were invited to a wedding on a beach in New Zealand. A maxi-length Kielo immediately sprung to mind. I envisioned the iconic flying squirrel pose. Nursing access was a nut I had to crack. Necessity required invention.
A number of sewists have added pockets to their Kielo and their modifications inspired my nursing hack. I left a small section of each “wing” unsewn in roughly the same place as others have added inseam pockets. To feed our baby, I simply loosened off or untied my dress and moved the unsewn section across my bust. He was able to latch through the gap in the seam. When the dress is tied again, the unsewn section is barely noticeable in the magical Kielo wrap.
How to Sew

- Finish each of your “wings” separately between the armscye and tie insertion point.
- When you join your front and back wings, leave a small section unsewn. My unsewn section was 5.5” long and centered between the armscye and the tie insertion point.
- Stitch down the seam allowances within the gap. This step helps the two sides to lie flat together when you wrap your dress. I used a zig zag stitch on my busy floral fabric but you could slip stitch the seam allowances by hand for an invisible join.
If you’re an avid fan of the Kielo and already have one, two or more in your wardrobe, you could easily make them all nursing friendly. Simply unpick a small section of each wing. There are some excellent tutorials online about how to unpick an overlock or serged stitch. It only takes a small gap in the wings to open up the milkbar in the fabulous Kielo Wrap Dress. That’s a win for mother and baby squirrel alike!
Thank you for sharing your hack Elizabeth! Want to make your own Kielo, for maternity or nursing? Find the pattern in our shop!
The post Kielo Wrap Dress Nursing Hack appeared first on Maternity Sewing.
]]>The post Draft Your Own Maternity Shirt: Babydoll Tee appeared first on Maternity Sewing.
]]>If you have a t-shirt pattern that fits you in the chest and arms you can hack it into a variety of different maternity shirts pretty easily. In this blog post we’ll walk you through how to hack a pattern into a maternity babydoll style tee.
Start by selecting a size on your shirt. As a rule of thumb, you’ll probably want to go up a size or two, and/or if your shirt pattern has separate cup size options you may want to choose a larger cup size. Over the course of pregnancy you gain weight all over your body, not just your belly. The amount each woman gains, when during her pregnancy she gains it, and how that affects her size (especially cup size) is different for each woman and if this is your first pregnancy it can be hard to predict. Better to have your shirt be a little loose than uncomfortably tight during a time when all of you is uncomfortable to begin with!
Next select your fabric. You’ll want to follow the fabric suggestions (most especially the stretch percentage) of your original shirt. However, you don’t want to use a fabric that is too thick because it will get too bulky when it is gathered at the waist seam. Another way to ensure that it will be comfortable as you gain weight (other than going up in size) is to use a higher stretch percentage fabric so consider using fabric that’s even stretchier than that suggested by the pattern.
This style of shirt can be worn postpartum as well, especially if you’re into the 90’s fashion resurgence going on right now! You can unpick (or just cut off) the lower portion to remove some width from the gathered panel if you’d like or just wear it as is. This is what it looks like on a body with a small belly.
Of course if you don’t want to draft your own pattern, you can always buy the perfect pattern already ready for you in our shop! Browse all of our knit shirts or, if you’re specifically looking for a babydoll style, check out XXXXXXXXXXX.
The post Draft Your Own Maternity Shirt: Babydoll Tee appeared first on Maternity Sewing.
]]>The post 6 Easy Ways to Wrap Your Infinity Dress appeared first on Maternity Sewing.
]]>Our infinity dress sewing pattern has instructions for a deluxe version that works for either pregnant or not pregnant bodies! It also includes an optional bandeau that you can wear (or not) with any of these styles for increased skin coverage.
1. Basic Straps. The simplest way to wrap your infinity dress is simply to bring the straps straight up over your shoulders. Gather them a little bit at the neck for a shapely front.
2. Twisted Straps. If you want a skinnier strap with a bit of extra pizzaz, twist the straps. Start twisting lower to reveal more décolletage.
3. Straight Straps. If you don’t gather the straps at the shoulder but instead let them come straight up you get a boxier, cap sleeve-like front.
4. Short Sleeves. Spreading the strap out as wide as it will go allows you upper arm coverage that mimics short sleeves or a little capelet.
5. Cap Sleeves. If you put a single twist in each strap at underarm height you make little cap sleeves that rest on your shoulders.
6. One Shoulder. Bringing both straps over a single shoulder gives an interesting asymmetrical look.
The post 6 Easy Ways to Wrap Your Infinity Dress appeared first on Maternity Sewing.
]]>The post Maternity Style: Laminaria Swimsuit appeared first on Maternity Sewing.
]]>Specs:
- Pattern: Laminaria Maternity Swimsuit bij Tuesday Stitches
- Size US 8, D-F cup
- Adjustments: Lengthened by 3″, moved strap position
- Fabric: Folk Art Floral on Flex base and Lining by Funki Fabrics
- Pictured at 34 and 38 weeks pregnant
When I got pregnant, a swimsuit was one of the first things on my list to sew. I’ve always worn bikinis, but in my first pregnancy I had bought a swimsuit to have more coverage. Somehow my pregnant belly just felt more private, and I wanted it covered up. But due to my height (5’10” or 178 cm) I had trouble finding one that fit me. The solution is of course to sew your own swimsuit!
I had never sewn a swimsuit before, and it is a lot of fun! It’s nice to change to a different fabric and different techniques from normal garments. And it is not at all as complicated as I thought. I also feel that being able to choose your fabric is especially fun for swimwear. I love this print, it makes for a unique swimsuit! This fabric and the lining were kindly supplied by FunkiFabrics. I chose this print (also in blue) and this lining in black. The fabric is nice and sturdy and the colors very saturated. Take note that it has a little less stretch than the pattern calls for, so you might want to go up a size.
I did not check the stretch percentage beforehand so it came out a little snug. However, my belly was not very big (due to diminished amniotic fluid and a small baby, in itself not very desirable) so I could still wear it until the end of my pregnancy. I really love the design, it even fit over my low bum and I like how it sits low at the hips. I changed the neckline a bit, basically shaving off two triangles at the top from the point of the V towards the straps (1″ at the strap tapering to nothing at the V). This made the top points sit lower and more towards the outside. My chest is kind of long (deep?) and I have broad shoulders, and I felt this adjustment created a better proportion.
I don’t really go swimming outdoors often, but we do go to toddler swimming sessions at the pool every week so I have put it to good use! And because it was a little snug in my pregnancy, I am still wearing it right now. The gathers at the side are obviously superfluous now, but due to the busy print they’re not that noticeable. And really, I just want to wear my me-made swimsuit so I don’t care!
Have you sewn swimwear before? Grab a copy of the Laminaria in our shop!
The post Maternity Style: Laminaria Swimsuit appeared first on Maternity Sewing.
]]>The post Draft Your Own Maternity Shirt: Swing Version 1 appeared first on Maternity Sewing.
]]>If you have a t-shirt pattern that fits you in the chest and arms you can hack it into a variety of different maternity shirts pretty easily. In this blog post we’ll walk you through how to hack a pattern into a belly skimming swing maternity tee shirt.
Start by selecting a size on your shirt. As a rule of thumb, you’ll probably want to go up a size or two from your pre-pregnancy size, and/or if your shirt pattern has separate cup size options you may want to choose a larger cup size. Over the course of pregnancy you gain weight all over your body, not just your belly. The amount each woman gains, when during her pregnancy she gains it, and how that affects her size (especially cup size) is different for each woman and if this is your first pregnancy it can be hard to predict. Better to have your shirt be a little loose than uncomfortably tight during a time when all of you is uncomfortable to begin with! (You can see that this shirt is actually a bit snug by the way it pulls across Gillian’s upper chest. Oops!)
Next select your fabric. You’ll want to follow the fabric suggestions (most especially the stretch percentage) of your original shirt. Another way to ensure that it will be comfortable as you gain weight (other than going up in size) is to use a higher stretch percentage fabric so consider using fabric that’s even stretchier than that suggested by the pattern.
It’s up to you whether you want to add the extra volume to both front and back or just to the front. In this example we just added swing to the front. It makes for a maternity shirt that skims over the belly without a ton of volume all over because the back is still slim fitting. However, adding it just to the front does mean that it doesn’t work very well as a postpartum shirt because the extra volume only in front emphasizes the belly.
To make your shirt into a swing shirt, rotate the side seam so that it pivots from the underarm and adds width at the hem. You can do this by tracing your pattern except for the side seam, putting a pin at the underarm, and pivoting the whole pattern at the pin before drawing the side seam. Or you can trim the pattern just inside the side seam without cutting it off at the underarm and pivot. Connect the new side seam to the existing hem with a gentle curve. It’s up to you how much width you want to add – too little won’t accommodate a third trimester belly while too much distorts the shirt. In this example we swung the side seam out 7″.
A large belly takes up both length and width. You can see in the photos that Gillian’s shirt rides up a bit in the front. If you don’t want this you can add a few inches (3″ is a good place to start) to hem at the center front of your shirt and draw a new gently curved hem (keeping the side seam length the same). This makes the shirt unsuitable for postpartum but you can always re-hem it.
Of course if you don’t want to draft your own pattern, you can always buy the perfect pattern already ready for you in our shop! Browse all of our knit shirts or, if you’re specifically looking for a swing style we recommend:
-
Sirocco Top & Dress
$12.00 Add to cart
The post Draft Your Own Maternity Shirt: Swing Version 1 appeared first on Maternity Sewing.
]]>The post Maternity Style: Goldilegs Jeggings appeared first on Maternity Sewing.
]]>Specs:
- Pattern: Goldilegs Jeggings by Stitch Upon A Time
- Skinny leg, Size XL
- Adjustments: 8 inches off length, 1 inch scooped out of lower belly
- Fabric: Cotton jersey and stretch denim
- Pictured at 21 weeks pregnant
Okay, friends. I decided a while ago that I would not buy any maternity clothes because they tend to be cheaply made and not at all my style. I wore holes through the thighs of all of my maternity pants the first time around, so my first order of business was to make comfy, work-appropriate pants.
I am a teacher and work in a semi-casual setting. My typical style is skinny jeans and a tunic or long sweater, so the narrow-leg Stitch Upon a Time Goldilegs jegging seemed perfect. I’ve still never really successfully made my own pants, so jeggings felt like a good gateway bottom to attempt.
I muslin-ed my first pair in powder blue corduroy from Blackbird. While the fabric is beautiful, I forgot how awful wide-wale cords look on my legs and how really not suited it was to a skinny-legged pant. It worked out okay, however, as I had a ton of fit-adjustments to make and the pants were never going to be wearable anyway.
For my two “good copy” pairs, I used stretch denim in black and indigo from Blackbird. Both had just enough stretch for the pattern and I was a little worried about fit. I cut an XL according to my measurements, and fit just fine. I actually think I would cut a size smaller if I were to make them again.
I am pretty short (5’2”) and knew I would need to shorten the pants. And boy did I! If you are tall, do not worry about lengthening this pattern. I shortened by two inches in the thigh, two inches in the calf/shin and took two inches off the maternity band (for a total of four inches off the height measurement when cutting). I still had to chop off two inches at the hem later. (I took a total of eight inches off the length, if you are keeping track).
I also decided to scoop out an extra inch in the front belly area. These jeggings have a high-rise as far as maternity pants go. Even with my extra inch in the front, the denim comes up over my belly. As a result, I find that the pants slide down more than other maternity pants I have worn. If I were to make these again, I would scoop out another two inches of the front belly (and would probably have to sacrifice the fly altogether) so that the denim sat below my bump. If you do this, I recommend adding extra length to you maternity belly band in the front so it comes up over your belly still. This means that you would no longer cut out a straight rectangle in jersey, but a sort of lemon shape with a curve to account for belly volume.
In my third, black pair, I tapered the ankle slightly. This pattern comes in a flare and straight leg, but I prefer my jeans skinny. I trimmed off a half inch on each side of both front and back pieces (for a total of two inches off the whole circumference) and graded it back out to the side over three inches of length.
The instructions for this pattern were comprehensive and super simple to understand. Even if you have never made pants before, you shouldn’t have any trouble putting these together. While these pants look like jeans, they are crazy fast to whip up. By my third pair, I didn’t have to look at the tutorial anymore and sewed the jeggings up in about five hours, from beginning to end.
The post Maternity Style: Goldilegs Jeggings appeared first on Maternity Sewing.
]]>The post Postpartum Style: Ivy Pinafore appeared first on Maternity Sewing.
]]>Specs
Pattern: The Ivy Pinafore by Jennifer Lauren Handmade
View & Size: View 1, Size 18
Adjustments: None. The pattern is drafted for a D cup, so I did not have to make a FBA.
Fabric: I used a mid-weight chambray fabric for the outer fabric. I used a cotton lawn and a woven rayon for the lining and a cotton lawn for the pockets.
Pictured at: ~9 months postpartum.
I’ve been eyeing the Ivy pinafore for quite some time now. Pinafores have become an integral part of my post-partum wardrobe, and I’ve been needing a few more for the coming warm/hot summer months. I really like the swishy look of view 1, so I started with that one (plus it looked more forgiving since there are no darts).
The pattern calls for “medium weight fabrics with drape in mind” with matching lightweight lining. I had * just* enough of a lovely heavier weight chambray that has been languishing in my stash for ages. My lining is made up of two fabrics, since I did not have enough of either; I’m happy that I got to use up some fabrics I was trying to purge from my stash. I used the cotton lawn for the pockets, as the pattern suggests lighter weight fabrics for the pockets. I used some lightweight fusible interfacing that I had in my stash, which was great for the fabric I used. The buttons, which many think look like citrus :), were a happy, recent find.
The fabric feels so luxurious and the swish of the fabric makes everything so comfortable. I did let the dress hang overnight, per the instructions, and I’m so glad that I did; one of the lining fabrics ended-up stretching out considerably. The pockets are amazing and can comfortably fit my phone, keys, and a small wallet! I’m sure as my little one grows, they’ll have plenty of extra room for toys, pebbles, and leaves.
I didn’t make any adjustments to the pattern. I love the length and it fits comfortably in the shoulder/bust area, which is an area I usually struggle with. I made it with fully functional buttons, which makes nursing access a breeze; however, getting the strap back over my shoulder is a bit difficult at times, since the straps are fairly short. The length is spot on for me. Not too short, but short enough that this will be great with tights/leggings for cooler months.
This style is definitely not in my comfort zone. I’m not known for wearing trapeze-like silhouettes; in fact I’m sure I’ve asked people the logic behind them in the past. However, this dress is very dreamy to wear, and I’m so glad that I tried it. My only regret is that I didn’t make it sooner. I would have loved this while I was pregnant in the hot summer months.
The post Postpartum Style: Ivy Pinafore appeared first on Maternity Sewing.
]]>