


If you’re a jeans-all-day-every-day woman like me, the first thing that probably won’t fit you anymore after you get pregnant are your favorite jeans. With a first pregnancy you might be able to squeeze in for a good few weeks, but with following pregnancies you’ll grow out of them pretty early on. You’ve probably heard of the non-sewing method before where you use a hair elastic to give yourself an extra inch. I’m not a great fan of this method myself, since your zip will get undone through movement and you have to pay attention not to show your panties and bare belly. Plus, it’s not that fast to unbutton for those frequent bathroom breaks. So today I’m sharing with you a simple but effective way to sew a waistband extender for jeans. At the time I made this tutorial I was 12 weeks pregnant with my second, and while my photo’s don’t really show my belly, my jeans certainly do. They already stopped being comfortable at 8 weeks, so I actually wished I had made this waistband extender earlier! The extender is also great for post-partum as you slowly return to non-maternity clothes.
What You Need
- Stretch denim in the same color of your jeans, about 6″ long and 10″ wide (15 cm long, 25 cm wide)
- Fusible interfacing (optional)
- A jeans button and tools to install it. These usually come in handy little kits, all you need then is a hammer
- A sewing machine capable of making a button hole
- Pins, jeans sewing needle (or just an 80/12 will often do as well, depending on the weight of your denim), seam ripper


Measurements
Start by measuring the ‘gap’ you need to fill with the extender. Measure the width at the top of the waistband to determine the total width of the extender. Measure the width between the buttonhole and the button. Measure the placement of the button and buttonhole from the top of the waistband. Also measure along the length of the zipper, extending an inch under the bottom of the fly, and reaching to the top if the waistband. My measurements in this example are 4 1/3″ (11 cm) for the top of the waistband, 2 3/8″ (6 cm) between the button and buttonhole, 5/8″ (1.5 cm) from the top of the waistband to the button, and 4 3/4″ (12 cm) for the height along the zipper.

Draw a triangle according to your measurements on pattern paper. You can flatten the corners a little, this will make them easier to sew as denim can get bulky in sharp corners. Draw in the location of the button and buttonhole. Insert it into your jeans to see if you got the measurements right. Adjust your triangle if needed.
Sewing

Cut out your pattern twice from the stretch denim. Make sure the stretch runs along the width of the triangle. Don’t forget to add a 3/8″ (1 cm) seam allowance. If your denim is lightweight, you can add a square of fusible interfacing over the button mark.

Sew around the edge at 3/8″ (1 cm), leaving a gap at one side. Trim the corners and the long edges as well to reduce bulk. Turn the triangle inside out, and push the corners out. Edgestitch around the edge, preferably in the same color as your jeans’ topstitching. Mine was brown, so I used a brown thread. It does not necessarily have to be topstitching thread though, normal thread will do fine. Mark the buttonhole and the button on the triangle.

Sew the buttonhole first, then install the button. If you have experience with buttonholes, you can dive right in. If not, then do a test run on a scrap piece of denim. My machine for instance always makes them slightly larger than I’d like, so I always test first. If you’re good to go, the sew it on the extender. Put a pin perpendicular over one end of the buttonhole, then slice it open.

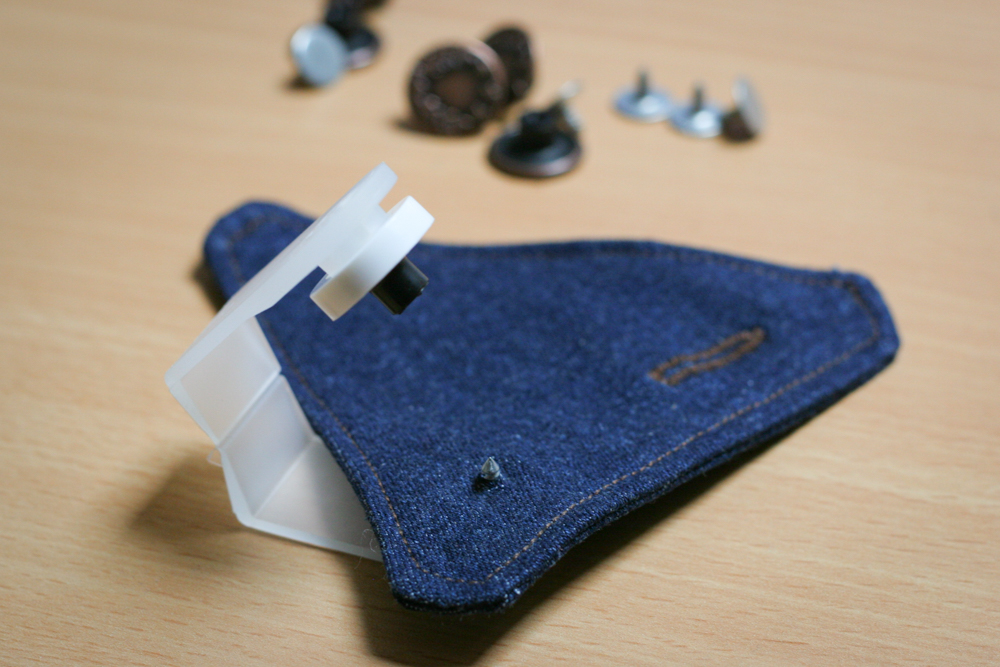
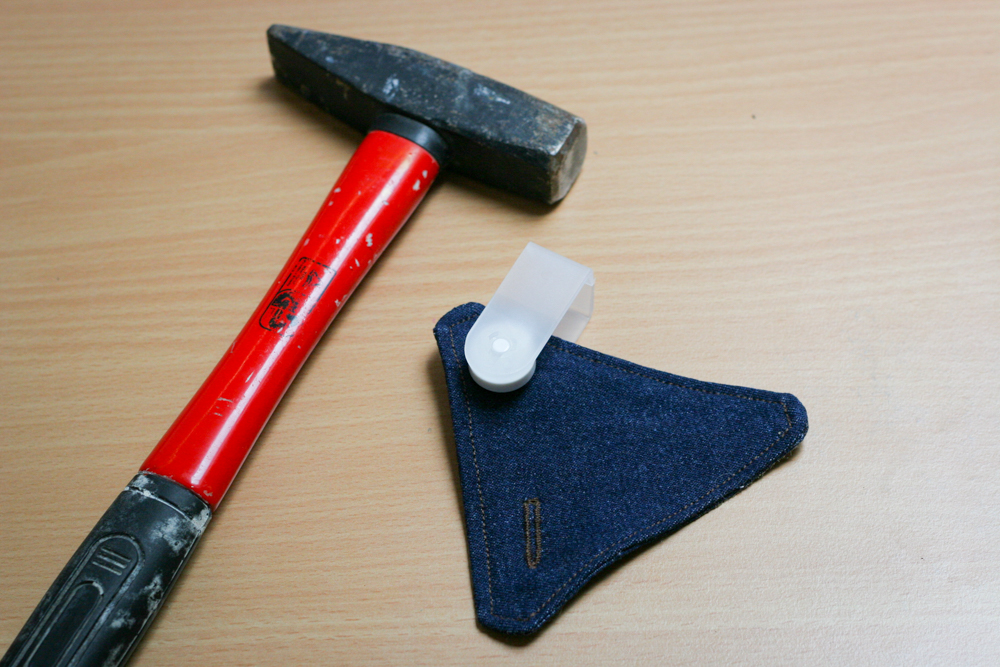
Make a little hole for the button rivet. You can do this with an awl, or just poke a little hole with your seam ripper. If you have a plastic clip like shown here, insert the button and rivet, then insert the rivet through the hole in the extender. Now put it all on a stable, sturdy underground like a tile floor or a workbench and give the button a good whack (or three) with a hammer. The trick with hammers is to hold them at the end so you have maximum swinging power.

And that’s it! You’ve just made a jeans extender that blends in with your jeans, is easy to unbutton, doesn’t show any belly or panties, and keeps your jeans on your hips. The stretch denim is comfortable and will make sure you prolong your jeans-wearing period a little longer.


Lisa is one of the co-founders of Maternity Sewing. She loves clothes with comfort at their core with design elements that make her feel unique and edgy. Besides Maternity Sewing, she designs and publish patterns as Paprika Patterns. She also has an Etsy shop called DIYpads with patterns for cloth menstrual pads.
Chime in!